
How to Migrate
Your Data Out of FileCabinet CS
A practical guide to exporting your client documents from Thomson Reuters FileCabinet CS before the 2027 sunset: how long it takes, what to watch out for, and how to do it yourself.
FileCabinet CS Migration
Outline
Every migration has six basic steps. In this guide we will cover the entire process, show you what to watch out for, and give you some tips to make it faster.
The complete process. Migrating data out of Filecabinet is all that we do. We would love to work with you, but this guide will give you everything you need to migrate your data yourself.
Estimating the time
FileCabinet migrations take time. Solving these two problems is where you will spend most of yours.
You need to convert the data from all of your drawers back into its native file type, but FileCabinet doesn't have a feature to let you do this all at once. You have to go one drawer at a time. You can't set the export to run when you leave for the day and come back the next morning to a completed job.
The export doesn't preserve your folder structure. Every document lands in one flat folder, and your drawer and folder organization has to be rebuilt afterward. We cover how in Step 4.
Three stats to check
Estimate how long it will take
The total export time will vary based on data size and number of files. Two firms can have 100GB of client data, but one firm might have 300 drawers while another has 800. Generally the size of the data in GB is the primary driver of export time.
350 drawers
389,876 documents
47 hrs of machine time
Full math worked out below ↓
Runtime is not the same as your time
Firms assume project time will roughly equal machine time, but even a fully dedicated resource isn't watching every drawer finish. Each one has to be started, checked, and occasionally restarted after a crash, and a five minute gap between drawers adds up to days across a whole cabinet. An optimistic rule of thumb: budget 15 minutes of human time per drawer on top of the machine time.
Example firm time estimate for Step 1
55 GB of data
350 drawers × 15 min
project time
40-hr work week
Prepping the export
Before you begin exporting your data there are a few steps to take to make the process faster, more reliable, and safe.
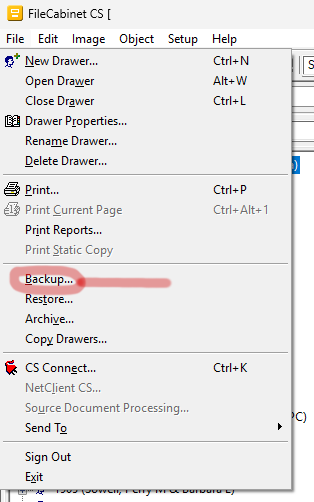
It's good practice to create a backup of your data before performing any type of migration work. Your live system stays untouched, data in a backup can't change underneath you mid-export, and FileCabinet has a feature that makes its backups particularly useful for migration work.
Note the option to exclude drawers unchanged since their last backup. It gives you the ability to sweep up anything filed during the project. Reference #2
Anything filed into FileCabinet after your backup has to be moved separately. Ideally, freeze filing for the export window (sometimes feasible).
If you can't freeze, the backup feature outlined in 1 gives you the ability to perform a final changed-items-only backup. This will catch everything filed after the cutoff so it can be swept up at the end. Reference #1
Use the Modify Backup Location button to choose where the backup will be saved.
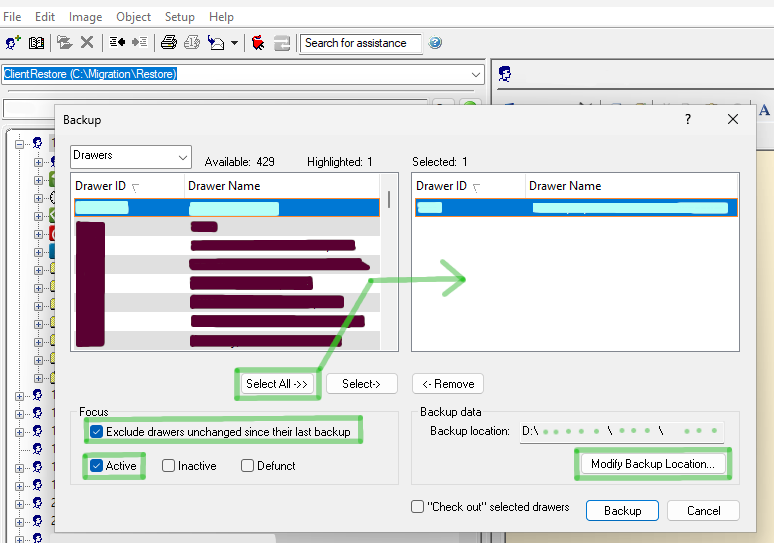
Every drawer you migrate costs time now and storage overhead later. To save time many firms choose to only back up and migrate their active clients. To do this, go to old or inactive drawers and set them as inactive in FileCabinet (right-click each drawer › Inactive).
When creating the backup be sure to check only the "Active" selection checkbox. Reference #1
This guide covers the standard on-disk format: a FileCabinet data folder on a drive (think C:\). It's the most common setup, even when your data is hosted in the cloud.
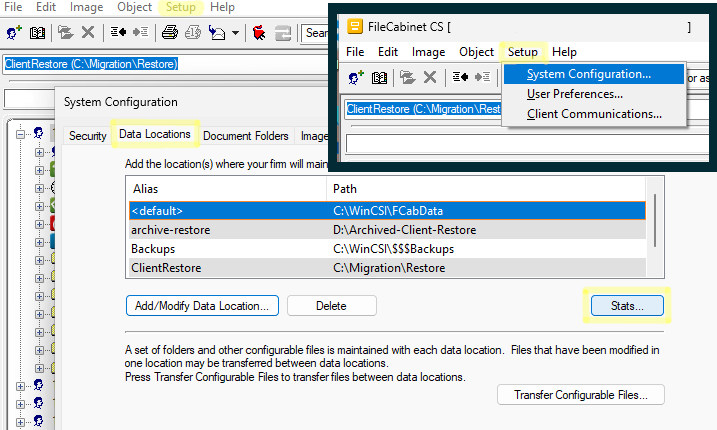
If you aren't sure what setup you are running, you can check in FileCabinet under
Setup › System Configuration › Data Locations
If you are running a SQL Server installation instead, reach out to us and we can walk you through that process.
Like many things in FileCabinet, there isn't a good way to set clients to Inactive in bulk, but the feature for deleting drawers is slightly more efficient than setting clients to inactive one at a time. If you don't have your clients tagged in FileCabinet, but you do already have a list of which ones need to be inactive, this method might help you save time.
1. Back up your entire dataset
2. Restore the data in a new data location
3. Delete the inactive drawers from the new location before performing the export.
Extracting a drawer
FileCabinet's built-in export converts a drawer's documents back into regular files on disk. It works one drawer at a time. This is the loop you'll repeat for every drawer on your migration list.
The export loop
- Select the client drawer you want to export.
- Go to File › Send To › File… to open the export dialog.
- Click Select › to add the drawer's documents to the export list on the right.
- Check your file name options and confirm the destination folder under Modify Destination…
- Click OK, let it run, and log the drawer as done. Repeat for the next one.
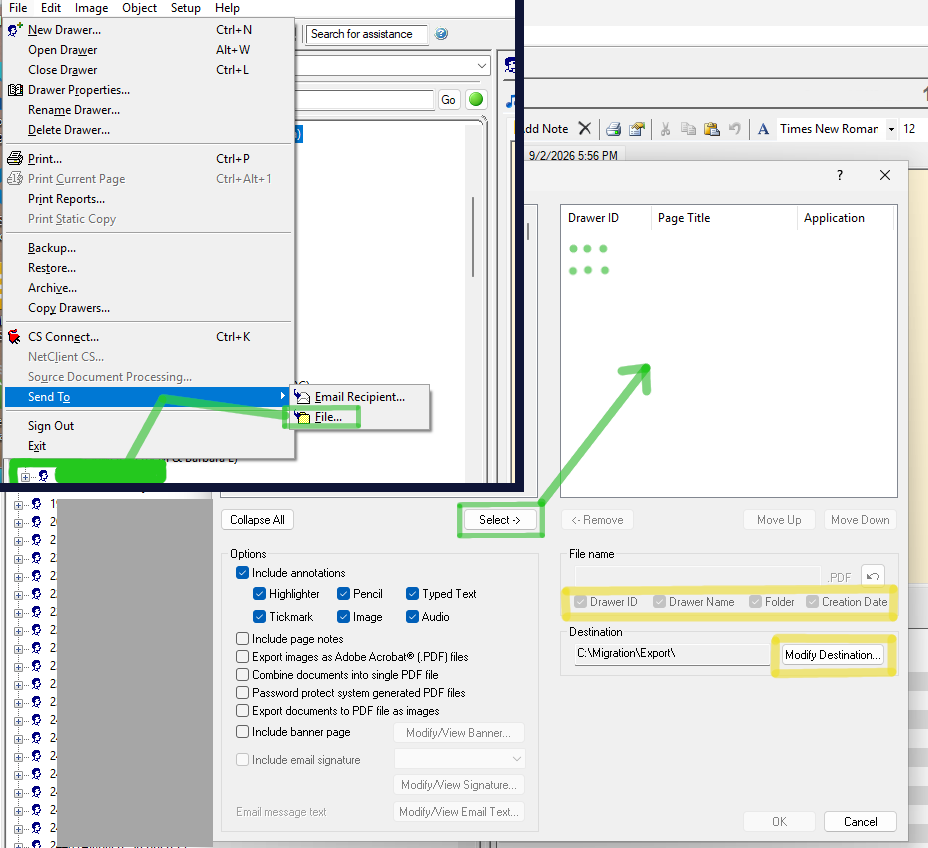
A few notes on the options
NOTE: you can combine documents into a single PDF file, but this option will also increase the overall export time.
It's rare, but occasionally the export will crash (particularly on large drawers). When you try to resume the export, FileCabinet will ask whether to replace the files that have already been exported (Yes/No). A bug in FileCabinet makes a second crash more likely if you choose "No". Choosing "Yes to All" when asked about replacing existing files will help prevent another crash.
Reconstructing the folders
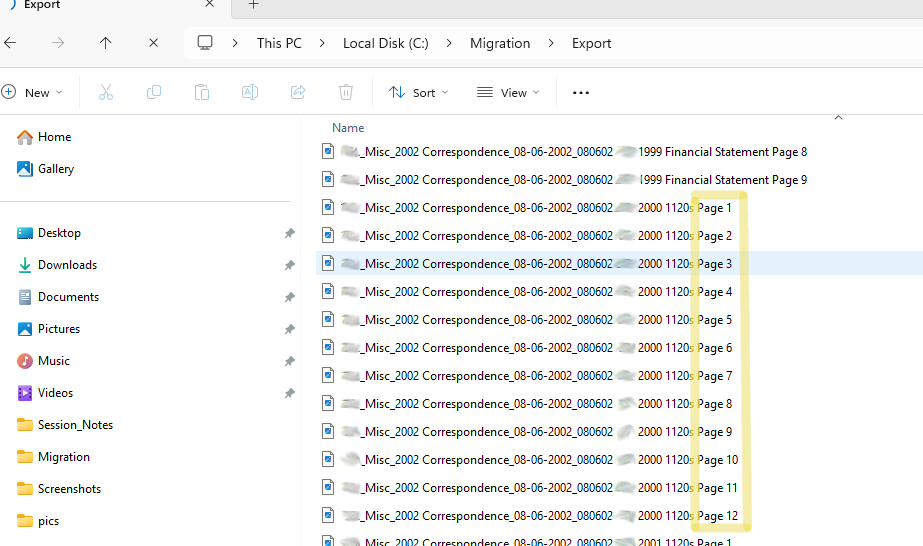
This is the step firms don't know exists until they get to it. FileCabinet exports everything into a flat output: one folder, thousands of files, no client subfolders. Multi-page documents may also come out as separate per-page files depending on the options you selected in the previous step (you can combine them into one, but that increases the export time). The filename options you set in Step 3 are the only thing carrying the drawer, folder, and date information out with each file.
Three ways to rebuild the tree
For a handful of drawers, dragging files into folders is fine. At 410,000 documents, thirty seconds each is 3,400 hours. Pick the approach that matches your volume.
The structure you rebuild may also depend on the format your new vendor requires. Some platforms build their client list straight from your folder names and don't want drawer IDs in them. Others expect year folders above or below the document type. Talk to your onboarding specialist at your new vendor before reorganizing. More on this in Step 6.
Automate it (Option 3)
Scripting is by far the fastest and most efficient method, but can be intimidating to tackle if you have never looked at code before. Fortunately, this is a relatively straightforward task that can be handled with a little help from modern AI tools. We have provided some example code below to help get you started along with a few things to ask.
# rebuild.py — flat export → client/folder tree
# 01234_DOE, JOHN_2025 Tax Documents_03-03-2026_030126 E-mail re Tax Info.pdf
import re, shutil
from pathlib import Path

EXPORT = Path(r"C:\Migration\Export")     # the flat export from Step 3
OUTPUT = Path(r"C:\Migration\Rebuilt")    # where the tree gets built

PATTERN = re.compile(
    r"^(?P<id>\d+)_(?P<client>.+?)_(?P<folder>[^_]+)"
    r"_(?P<date>\d{2}-\d{2}-\d{4})_(?P<doc>.+)$")

for f in EXPORT.iterdir():
    m = PATTERN.match(f.stem)
    if m:                                  # parsed: file it properly
        dest, name = OUTPUT / m["client"] / m["folder"], m["doc"] + f.suffix
    else:                                  # couldn't parse: set aside for review
        dest, name = OUTPUT / "_unparsed", f.name
    dest.mkdir(parents=True, exist_ok=True)
    shutil.copy2(f, dest / name)           # copy — the export is never touched
An AI assistant (Claude, ChatGPT, Copilot) can handle the technical part. Here are some prompts that will help you get there.
- Background. “I'm trying to recreate my folder structure that was lost during a bulk document export. I have a list of files with their organization metadata embedded in the file name. I also have an example Python script for recompiling the folder structure. Take a look at this code and tell me how to modify it for the specific types of folders I have in my environment.”
- Get set up. Paste the script.
- Tailor it to your export. Feed in your exact folder template structures from Setup › Document Folders: “Adjust the script's pattern so all of these parse correctly.”
- Test on a small batch. Run the updated script, then open the rebuilt folder and spot-check that files landed under the right client and folder.
- Fix the stragglers. Look in _unparsed, paste a few of those filenames back in, and say: “These didn't parse. Update the script so they get filed under the right client and folder.”
- Repeat until clean, then run it all. When a test batch leaves _unparsed nearly empty, point the script at the full export and let it finish.
Verifying everything
is there
Most people skip this step, but it's the only way to know whether the previous steps worked.
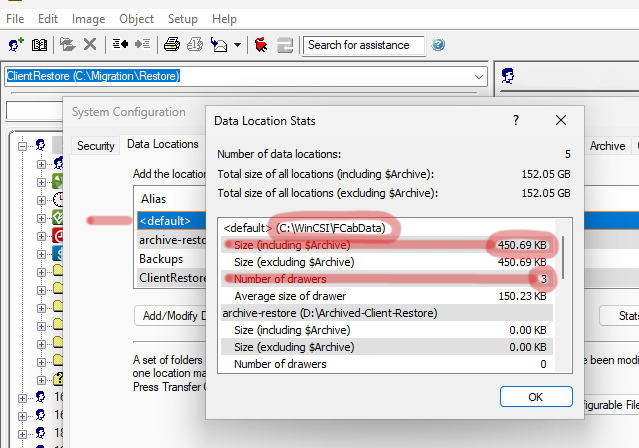
- Reconcile counts per drawer. Count the files under each rebuilt client folder and compare with the stats listed in Filecabinet. Any gap gets investigated before you go further.
- Find the zero-byte and tiny files. Sort the whole rebuilt tree by size. Anything at 0 KB, or under about 2 KB for a PDF, did not export correctly. These are invisible in a folder listing and obvious in a size sort.
- Spot-check with a human, across the whole date range. Open twenty documents: your oldest years, middle years, and last year. Older scans by earlier staff fail most often. Then hand a sample of rebuilt client folders to the person who knows the filing system. They will spot a structural problem in thirty seconds that no count or hash will catch.
Replace all existing files? › Yes to All
An incomplete archive that everyone believes is complete is worse than no archive. The gap is discovered years later, by a client, during something that matters, and the source system is long gone. It's a bit of a painful process, but roughly a two-hour job that you only have to do once. It is the cheapest insurance in the process and gives you the peace of mind that you won't need to keep a machine running FileCabinet around for the next 7 years.
Uploading into
the destination
Every platform wants a slightly different shape. Find out what yours wants before you upload, not after.
6.1 · Match the import shape first
Most accounting platforms build their client list and folder hierarchy from the folder structure you hand them, but they differ on the details. Does the client folder name need to match a client ID? Do year folders sit above or below document-type folders? What characters are allowed? Ask the vendor for their import spec, adjust Step 4's script to produce exactly that, and rebuild once rather than reorganize twice.
6.2 · Pilot one client end to end
Upload a single rebuilt client folder. Then, as a user: find their 2019 return, open it, search for it by name, check that the year folders are in the right order. Fix anything wrong in the script, rebuild, and only then run the full load.
6.3 · Confirm the forward workflow
FileCabinet's quiet superpower was that finished returns printed straight into the right drawer. Make sure the equivalent works on the new platform, whether that's UltraTax's print-to-DMS integration or whatever replaces it, before filing season.
6.4 · Keep the source until a full cycle has passed
Do not delete, wipe, or decommission the FileCabinet machine on the strength of a successful upload. Run both through one full season. When nobody has needed the old system for a cycle, retire it. Archive copies in two places, one offsite. After the sunset you will still be able to read your old data if you need to, so it's worth keeping around until your retention period has ended.
Where doing it yourself
makes sense
The archive is modest
- Under roughly 100 GB and a few hundred drawers
- Someone has real time in a quiet month
- The filing has been consistent for most of its life
- You're on the standard local install and the export runtime is tolerable
Any of these is true
- Hundreds of gigabytes or thousands of drawers
- FileCabinet is hosted (Rightworks or similar) and you need a backup off the platform first
- SQL Server format and nobody in-house writes SQL
- The only person who could do this is the person you can't lose for a month
A FileCabinet migration is going to take more time than you think it will… but that may not be a problem. We have developed proprietary automated tools for every step of the process outlined in this guide. Even with those tools, migrations still take days and require manual review. In a highly seasonal business this may not be a problem. If you have the time and resources available, this is definitely a project you can handle in house. Work from a backup, figure out how to reconstruct your folders for your new software platform, and set aside some time daily to work on the migration. Over a month or two you can get it done. For everything else…
Call us if you have any questions
FileCabinet migrations are what we do. We don't care where you go; we just want to help you get there. We don't have contracts with any SaaS vendor and we will give you honest advice.
We're here even if you decide to do it on your own. If you have a question about anything in this guide or need any help, please reach out and we will be happy to assist you.
This guide is general information and does not constitute legal, technology, or professional advice for any particular firm. Product names are the property of their respective owners. Test every step against a backup before running it against your only copy.